Hello loves! I've been on a project this morning and it turned out so smash smash that I had to share!
Say hello to my newly made over Microwave!...and me...reflected in the toaster...in my Scottie pj's! Ha!
This massive waste of space was not only bulky, but brown (gaaahhh the horror!) before.
It took up way too much room to be so dark and muddy. After all, this is a Brady Bunch Orange Kitchen!! So, as I'm pretty well skint...as you could probably tell from the way I balked at first at the $200 price tag on my Sculptra dining room...I can't buy a new one and have to make do.
I bought some flower power wrapping paper at Michael's not long ago for a project of redoing some old TV trays that I've not been able to start on yet as I need warmer, dryer days in order to paint. As I have plenty, I decided to use some of it to cover the micro!
At first, I thought I'd just decoupage the blasted thing....and I still might!...but as it's technically my grandfather's and my mom thinks brown and almond and beige and off white are the only acceptable decor colours, I didn't want to do anything permanent...yet.
So, here's what I did:
1. Measured the entire area that was to be covered and added a little extra (about a centimeter to each edge.
2. Squared up the paper then tapped one side edge underneath all the way across.
3. Began slowly taping (rolling my tape pieces to make them sticky on both sides) the edge up to the top.
4. Be sure to put tape roll under the top edge!
5. Do the same to the top edge and the other side edge, smoothing out as you go.
6. Now tape the bottom of the other side just as you did the first side in step 2.
7. Continue up the back, top, and other side, folding the extra paper at the corners.
8. Be sure not to cover any vents! Cut the paper and tape to avoid this if you have to!
VOILA!
To answer a couple of questions I know will arise: I didn't go the easy route and just use stick on shelf liner instead of paper for two reasons. 1. It's been known to take paint off when you remove it. 2. When was the last time you've seen shelf liner in anything but boresville, bland, timid prints and patterns? I wanted colour! Obnoxious colour!!
The second, as to why I used regular tape rolled instead of double sided...Simple. It's easier to pull off without damaging the paper if I ever want to do a permanent decoupage job of this!
Tuesday, 12 February 2013
Monday, 11 February 2013
Gotcha Covered!...Broyhill Sculptra Chairs Get 'Dolled' Up!
Well dahlinks, I've gotten my new old dining room chairs recovered in that smash smash fabric I showed you the other day! They look amazing, don't you fink?
Please forgive the truly annoying and random quality of the photos! My camera is really weird about taking pics at night, even with the night setting on!
Case in point: This photo was taken within seconds of the first, yet the lighting is perfect.
And yes, that is the original early '70s white on white fake stone laminate in the entryway! Isn't it just tacky fab?? I luuuuuurve it! And I'd love to keep it, but it's beginning to discolour ever so slightly in spots so it'll likely go with the 'Ugliest Carpet In the Free World' and the horrible early '90s laminate in the kitchen (which is waaaay more discoloured and proves that stuff in the '70s on back was much better and longer lived than the crap they've been producing for the last 20 years or so). Maybe I can find some old stock or some new and similar to replace it? Any of you lovelies have any ideas?
Chairs that Jackson Pollock would be pleased to have din dins on, I reckon!
Pip Pip Cheerio was not impressed by the whole event and passed out after the first chair was done....
I found the stamps on the bottom of the chairs and, if I'm reading the numbers correctly, I believe this set was made in September of 1958. That would make it VERY early (second year) of the Sculptra collection!
Here's an inspirational Sculptra image! God, how I love this set! I'm actually beginning to love it as much, if not more than my much coveted Brasilia!
Head on over and visit Pam on Retro Renovation to read more on Sculptra AND Brasilia!...or just to read up on more mid century fabulousness! Best blog EVER!
XX
Labels:
1950s,
1960s,
1970s,
Broyhill,
Sculptra,
vintage decorating,
Vintage Home
Saturday, 9 February 2013
Thursday, 7 February 2013
This Week's Haul
Ok, kids. I promised you a thrifty thrill today and I will not disappoint.
The Back Story:
When I decided to move into my grandparents' old house after my grandfather moved in with my parents, I knew I didn't want the dining room suite that was there. As lovely as it was...and it really is a gorgeous suite (late '70s Pulaski Keepsake)...it just isn't remotely my style. The china cabinet was huge...luckily my mom took it to use in her bedroom which, quite providentially is also Pulaski Keepsake!
The table, however was a different matter. A massive, oak behemoth of a clawfoot pedestal table. The chairs were equally massive, 4 captain's chairs with leather seats
.
Mom decided she also wanted the table when she realized that my grandfather was RUINING her own turn of the century Sears catalog pedestal table. He's soooo bloody rough with everything and was literally pulling the thing apart. But she refused to take it until I could find a suitable replacement as she wanted me to have something to eat on! I tried to tell her to go ahead and take it, but as mothers are want to do, she wouldn't hear of it.
Therefore, I've been searching and scouring Craigslist, facebook selling sites, antique stores, thrift shops, and used furniture places for months trying to find the perfect dining room table.
The Rest of the Story:
Finally, about two weeks ago, I found a steal and I MEAN a real steal.
I'm forever searching 'Broyhill' on Craigslist. My dream dining room is Brasilia...whose isn't, I ask you!...and I'm always hoping that I'll find some pieces on the cheap!
I didn't find any Brasilia that day, but I did find my #2 'dream dining room' listed this way:
"Nice older Broyhill dining room set with hutch. Table w/ drop down sides, extra leaf, 6 chairs (5 regular, 1 captain), hutch (54in wide, 56in tall) has nice storage (3 drawers, shelves, drop open serving station)."
The pictures, however, left no doubt as to the identity of this elusive little butterfly......SCULPTRA!!!!
And, as if just FINDING one wasn't exciting enough, the price was great. The bad thing was that it was $200. Now, I hear you saying "$200?? For a Sculptra suite??? And you're complaining??". But alas, my Scottish heart won't let me ignore my budgey. And it was $50 over what I'd promised myself I'd spend.
So I put her out of my mind until a conversation a couple of nights ago when I mentioned them to the OH. "I can tell you want that set pretty badly. Do you think they still have it?", he asked.
"Doubtful", says I, "Especially at that price. Even someone who doesn't know what it is or worth will have snagged it by now."
But I was still thinking about it when we hung up. Determined that I really SHOULD buy the darn thing even if it was slightly above my budgey, I went on Craiglist and searched for the ad, not expecting it to be there.
Not only was it there, but........they'd reduced it to $150!! That was the official, "Please come get me and take me home, Miss Doll!!"
My dad helped me move her in and the old dining room out today!
And here she is, in all her glory, in MY dining room. I seriously have been pinching myself for the last few hours! My arm is quite blue!
The table is slightly curved at the ends. The ends are drop leaf, so it can be made into a very small table and there's also an extra leaf to make it even longer!
....for months. I found it at Habitat for $2, but when I bought it, I was expecting to be covering 4 chairs, not 6! So I may cover the captain's and one side chair in solid blue.
Well, there she is, This Week's Haul!!
Did you muchkins find any goodies or steals this week?
The Back Story:
When I decided to move into my grandparents' old house after my grandfather moved in with my parents, I knew I didn't want the dining room suite that was there. As lovely as it was...and it really is a gorgeous suite (late '70s Pulaski Keepsake)...it just isn't remotely my style. The china cabinet was huge...luckily my mom took it to use in her bedroom which, quite providentially is also Pulaski Keepsake!
The table, however was a different matter. A massive, oak behemoth of a clawfoot pedestal table. The chairs were equally massive, 4 captain's chairs with leather seats
.
Mom decided she also wanted the table when she realized that my grandfather was RUINING her own turn of the century Sears catalog pedestal table. He's soooo bloody rough with everything and was literally pulling the thing apart. But she refused to take it until I could find a suitable replacement as she wanted me to have something to eat on! I tried to tell her to go ahead and take it, but as mothers are want to do, she wouldn't hear of it.
Therefore, I've been searching and scouring Craigslist, facebook selling sites, antique stores, thrift shops, and used furniture places for months trying to find the perfect dining room table.
The Rest of the Story:
Finally, about two weeks ago, I found a steal and I MEAN a real steal.
I'm forever searching 'Broyhill' on Craigslist. My dream dining room is Brasilia...whose isn't, I ask you!...and I'm always hoping that I'll find some pieces on the cheap!
I didn't find any Brasilia that day, but I did find my #2 'dream dining room' listed this way:
"Nice older Broyhill dining room set with hutch. Table w/ drop down sides, extra leaf, 6 chairs (5 regular, 1 captain), hutch (54in wide, 56in tall) has nice storage (3 drawers, shelves, drop open serving station)."
The pictures, however, left no doubt as to the identity of this elusive little butterfly......SCULPTRA!!!!
And, as if just FINDING one wasn't exciting enough, the price was great. The bad thing was that it was $200. Now, I hear you saying "$200?? For a Sculptra suite??? And you're complaining??". But alas, my Scottish heart won't let me ignore my budgey. And it was $50 over what I'd promised myself I'd spend.
So I put her out of my mind until a conversation a couple of nights ago when I mentioned them to the OH. "I can tell you want that set pretty badly. Do you think they still have it?", he asked.
"Doubtful", says I, "Especially at that price. Even someone who doesn't know what it is or worth will have snagged it by now."
But I was still thinking about it when we hung up. Determined that I really SHOULD buy the darn thing even if it was slightly above my budgey, I went on Craiglist and searched for the ad, not expecting it to be there.
Not only was it there, but........they'd reduced it to $150!! That was the official, "Please come get me and take me home, Miss Doll!!"
My dad helped me move her in and the old dining room out today!
And here she is, in all her glory, in MY dining room. I seriously have been pinching myself for the last few hours! My arm is quite blue!
The table is slightly curved at the ends. The ends are drop leaf, so it can be made into a very small table and there's also an extra leaf to make it even longer!
The Buffet/Hutch is in two pieces. The right side pulls down to make a serving area and reveal shelves. It'll make a great laptop desk!
Please overlook 'The Ugliest Carpet In the Free World'. I actually got in trouble back in the '80s when my grandmother put it in. I actually TOLD her how ugly it was. Not a smart thing for an 8 year old to do. It is, however, the next thing being ripped out of this house and replaced with black and white checks!!
And on the inside of the top drawer, THE label!
There's only 1 captain's chair. It's got some condition issues, but it's something that can be masked until I can have it professionally redone.
There are 5 of these bad boys! This one and two of the others have their original seat covers. The other two have a horrible pinkish red cover. All of these will be coming off this weekend! I've been saving this fabric.....
Well, there she is, This Week's Haul!!
Did you muchkins find any goodies or steals this week?
Labels:
1960s,
Broyhill,
danish modern,
dining room,
Sculptra,
vintage decorating,
Vintage Home
Wednesday, 6 February 2013
People, Get Ready....
Hello, my dears! Today's post will be a tiny peek at what the next 'This Week's Haul' post will be. I'll leave you with this....and the anticipation of what's to come...


Labels:
1960s,
Broyhill,
danish modern,
Sculptra,
vintage decorating,
Vintage Home
Monday, 4 February 2013
My Mid Mod Nest--The 'Brady Ponderosa' Kitchen, Before and After
Well my dears, as I mentioned in a previous post, I've finally moved
into my grandparents' "time capsule" early '70s house! Yaayyy! It was a LONG three and a half months to get to the moving in, and it's
still a work in progress, but it's beginning to come together! Here's a
few pics and a post that I had drafted right before I moved in but had
never published!
Things have slightly improved in a few areas since I drafted this, so I'll post more and better once I get some good, up to date photos (it's been soooo dark around here lately that it's hard to take any!).....
THE 'BRADY PONDEROSA' KITCHEN:
If you'll remember, this is what the Brady Ponderosa looked like before...
The Poppy Red fridge had died years ago and had been replaced by a tiny dorm refrigerator and the matching oven was on it's last legs (oven didn't work at all and one eye was dead). Now, if the fridge had still been there, I might have kept the set. But as it was, I knew I'd never find the colour match and the oven would have been expensive to fix. So I opted to instead bring the oven and refrigerator from the canning kitchen in the basement as they both worked and...more importantly...were white!
The oven just needed a good cleaning. The refrigerator (a mid-late '60s Hotpoint), on the other hand, needed more than a cleaning...
Yep kids, that's rust coming through the paint. So I opted to repaint him. To be honest, I don't know that it's something I ever want to endure again. It's a lot of work and takes a lot of time and effort. But it was well worth it......
Here's how I did it, in case you're so inclined:
1.
I brought him up on the carport and cleaned him inside and out with a
bleach and water solution while he defrosted...pay close attention to
the door gaskets as they tend to get stained from not only age, but also
from mold that can sometimes grow in spots where you're losing air. I
then left him overnight to finish defrosting.
2.
I scrubbed him down once again, this time with TSP (Tri Sodium
Phosphate). This stuff is a miracle. Really. It takes off everything
but the paint and the rust! Word to the wise, though: Be sure to wear
rubber gloves with this stuff. If it takes off dirt that easily,
imagine what it will do to the skin on your hands!
3.
Speaking of rust, that was the next step...getting rid of it and
getting a smooth surface to paint. To do this, I used 220 sandpaper.
Once I'd sanded everything (don't forget the sides and inside lip of the
doors!), I dusted it and repeated the sanding again with the 220. Then
I dusted it again. Another word to the wise: If you're sanding
anything from this era, there's a good chance it could be lead based
paint that you're sanding. Wear protection! I not only covered every
inch of my body and head, but also wore goggles and a mask. No sense
taking chances with your health, my dears!!
4. Then, I sanded it with 400 wet or dry sandpaper. Once that was done, I cleaned it with water and let it dry.
5. I vacuumed the coils and underneath. If you have a drip tray, take it out and clean it.
6.
Then I taped off everything I didn't want painted: the inside of the
doors, the inside of the fridge itself, the handles, the logo on the
front, the info plate, the coils. I also taped the INSIDE of the gasket
(I painted the outside--just the part that can be seen when it's
closed--because it was stained so badly it wouldn't come clean--but you
want to make sure that you don't paint the inside part that 'connects'
with the door when it closes as that could affect your seal!)
7.
Then, I painted. Use Rustolium appliance epoxy. You can get it at
Lowes or Home Depot...unfortunately it doesn't come in many
colours---just white black and almond---and it's super cheap! This
stuff is a PAIN! Not only does it stick to everything but it gets
EVERYWHERE! I wore a hazmat suit, goggles, a mask, a shower cap, and
the hood that's attached to the suit...I STILL had it all in my nose,
eyelashes, and even in my hair despite all the covering up! And the
overspray is terrible! No matter how much you cover, it'll just go that
much further! On the plus side, when you finish, the overspray comes
up easily with a scrubby sponge, water and TSP if you clean it within an
hour or so. The paint itself is pretty good, but you have to watch it
as it tends sometimes to want to 'spit' which leaves little spots that
you can't fix....that's the thing about this stuff, once it's on it's
on! It's not like normal paint. And if you mess up or miss a spot, it
can only be repainted within a half hour, otherwise you have to wait a
week to redo it. It doesn't run too badly unless you get too close. I
did, but thankfully it was on the 'test' side (once installed it is
against a wall and can't be seen). I highly recommend starting on a bit
that won't show until you get the knack of this stuff. Again, it's
epoxy and doesn't behave like normal spray paint!
8. Leave it be for at least a day. It says 9 hours, but leave it 24...I left mine almost 48 just to be safe.
Here he is in place next to 'Mags'...my mid-late '60s Magic Chef Series IV oven...
Here's some better shots of 'Mags' herself....
Isn't
she lovely? She has one issue...she won't shut off when she gets to
the set temp on the oven. I think the sensor bulbs either gone bad or
gotten jiggled loose in all the moving she's been doing lately! But
it's not a big deal and I can put up with it for a while until I can get
her a new one!
(edit....I now have determined that Mags is exactly 100 degrees off. If I need 250, I set her for 150. Simples!)
My sofa and chair turned out fab as well, in case you're wondering. I only have a pic of the sofa at the mo, but here's a sneak peek at the living room! I'll do a detailed post with updated pics soon!....
That's that for now, loves! Hope to be back soon to fill you in on all the magnificent goings on in my mid mod world!
Xx
Labels:
1960s,
1970s,
Brady Bunch,
Hotpoint,
how to,
Kitchen,
Magic Chef,
mid century,
Orange Kitchen,
Oven,
Paint a Refrigerator,
Refrigerator,
Renovation,
Series IV,
vintage appliances,
vintage decorating,
Vintage Home
Sunday, 3 February 2013
Collection: Anchor Hocking Fire King Jadeite
Hi loves! It's a cold and snowy day here, so I made my mom's traditional snowy day recipe, Biscuits and Chocolate Gravy. Yummy!
While whisking the egg for my accompanying mushroom and cheese omelet and admiring the bowl, I thought it would be fun to share my small collection of Anchor Hocking Jadeite. I don't have a massive collection. The pieces I have are all inherited, but I do plan on adding to my collection especially as the collection as it stands now is almost totally the 'Restaurant Ware' Jadeite, which is a bit boresville in the design department. The colour, however, more than makes up for it!
Plates:
The pink ones were also used in the restaurant, but aren't Anchor Hocking. They're 'Shell Pink' by Sterling. The plates are a work in progress. Having been washed in hard water for over 60 years and usually drip dryed, they've got a lot of residue on them. This can be removed by vinegar bath, but it's a process that takes several applications!
I only have one bowl:
I use this little guy for lots of things, but most mornings it helps me whisk my eggs! I so very much want more of these! He's a terrific size!
C-Handle Mugs:
As you can see, I have a set of 7. At first I thought I had a complete set of 6, but then found one in my grandfather's bathroom holding his toothbrush! Now I want to find one more to make a set of 8, but MY GOD!, they're expensive!! Most I've found are in the $60-$70 range EACH! Sheesh! I think I'll just have a set of 6 with one extra as a just-in-case-one-breaks fallback!
Jadeite was made between the 1940's and 1970's by Anchor Hocking. They were cheap and affordable and, more importantly, very rugged and hard to break...especially the heavy, chunky restaurant ware. This would account for their use in my grandparents' restaurant back in the 1950's.
All of my pieces are marked with the 1940's Fire King logo:
This indicates that the pieces were most likely inherited by them as well from the previous owners of the restaurant. My grandparents bought the place in 1955.
Another piece that I adore...this one from my other grandmother...is the lotus plate and bowl:
This piece is from the 'home' series of Jadeite that was intended for light, everyday use in the typical post-war American home. It's thinner and much more delicate than the Restaurant Ware. It has a prominent place on my corner cupboard (also inherited from the same grandmother!) in my dining room.
I just love the colour of Jadeite! It goes with absolutely ANY other colour you can pair it with. It works beautifully in my Brady orange kitschen! So well, that I've added some other Jadeite green pieces as well.
This clock was in my other grandmother's kitchen for over 40 years:
Another piece from her kitchen, is a jadeite green knife holder:
She'd painted it at some point. Here's the back with the original tag and what I assume is the colour it originally came in:
I haven't got it hung yet, but I will! Isn't the Art Deco-ness just to die for??!! And goodness knows, the only thing that gets my heart racing as much as Mid-Century is Art Deco!
Another fun piece from my maternal grandparents' original restaurant also resides in my 'kitschen'...the Jadeite coloured Hamilton Beach Drinkmaster:
My mom was so thrilled when we found the original cups for it in my basement! We immediately bought milkshake ingredients and she proceeded to teach me the fine art of soda jerking! Imagine being taught the 'correct way' to make a milkshake on a vintage milkshake maker BY the person who actually used THAT EXACT MACHINE to make them as a teenager back in the the '50s and '60s! She hadn't lost her touch either! Best milkshake EVER!
I have some other pieces of Jadeite green vintage goodness being used in the master bathroom. A flower pot just like this one:

Can't post a pic of the actual one because my mom is currently transplanting some of my grandmother's aloe plant into it for me!
And one of my favourite pieces, a jadeite green soap holder:
I found this guy in an old trunk of my great-grandmother's along with a TON of vintage 1930's-1940's wallpaper.
I want to continue my collection of Jadeite.
Some of my dream pieces....
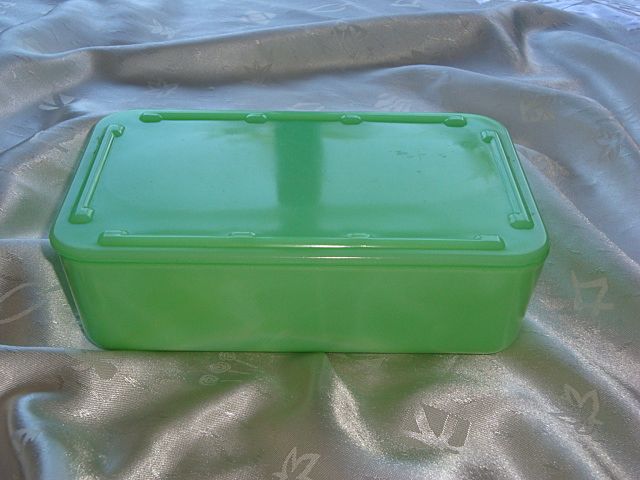
Refrigerator dish

Scottie dog salt and pepper shakers! Couldn't you just eat them up??!!

Pitcher

Do any of you lovelies collect Jadeite? Tell me all about your collections!!
xx
While whisking the egg for my accompanying mushroom and cheese omelet and admiring the bowl, I thought it would be fun to share my small collection of Anchor Hocking Jadeite. I don't have a massive collection. The pieces I have are all inherited, but I do plan on adding to my collection especially as the collection as it stands now is almost totally the 'Restaurant Ware' Jadeite, which is a bit boresville in the design department. The colour, however, more than makes up for it!
Plates:
The pink ones were also used in the restaurant, but aren't Anchor Hocking. They're 'Shell Pink' by Sterling. The plates are a work in progress. Having been washed in hard water for over 60 years and usually drip dryed, they've got a lot of residue on them. This can be removed by vinegar bath, but it's a process that takes several applications!
I only have one bowl:
I use this little guy for lots of things, but most mornings it helps me whisk my eggs! I so very much want more of these! He's a terrific size!
C-Handle Mugs:
As you can see, I have a set of 7. At first I thought I had a complete set of 6, but then found one in my grandfather's bathroom holding his toothbrush! Now I want to find one more to make a set of 8, but MY GOD!, they're expensive!! Most I've found are in the $60-$70 range EACH! Sheesh! I think I'll just have a set of 6 with one extra as a just-in-case-one-breaks fallback!
Jadeite was made between the 1940's and 1970's by Anchor Hocking. They were cheap and affordable and, more importantly, very rugged and hard to break...especially the heavy, chunky restaurant ware. This would account for their use in my grandparents' restaurant back in the 1950's.
All of my pieces are marked with the 1940's Fire King logo:
This indicates that the pieces were most likely inherited by them as well from the previous owners of the restaurant. My grandparents bought the place in 1955.
Another piece that I adore...this one from my other grandmother...is the lotus plate and bowl:
This piece is from the 'home' series of Jadeite that was intended for light, everyday use in the typical post-war American home. It's thinner and much more delicate than the Restaurant Ware. It has a prominent place on my corner cupboard (also inherited from the same grandmother!) in my dining room.
I just love the colour of Jadeite! It goes with absolutely ANY other colour you can pair it with. It works beautifully in my Brady orange kitschen! So well, that I've added some other Jadeite green pieces as well.
This clock was in my other grandmother's kitchen for over 40 years:
Another piece from her kitchen, is a jadeite green knife holder:
She'd painted it at some point. Here's the back with the original tag and what I assume is the colour it originally came in:
I haven't got it hung yet, but I will! Isn't the Art Deco-ness just to die for??!! And goodness knows, the only thing that gets my heart racing as much as Mid-Century is Art Deco!
Another fun piece from my maternal grandparents' original restaurant also resides in my 'kitschen'...the Jadeite coloured Hamilton Beach Drinkmaster:
My mom was so thrilled when we found the original cups for it in my basement! We immediately bought milkshake ingredients and she proceeded to teach me the fine art of soda jerking! Imagine being taught the 'correct way' to make a milkshake on a vintage milkshake maker BY the person who actually used THAT EXACT MACHINE to make them as a teenager back in the the '50s and '60s! She hadn't lost her touch either! Best milkshake EVER!
I have some other pieces of Jadeite green vintage goodness being used in the master bathroom. A flower pot just like this one:
Can't post a pic of the actual one because my mom is currently transplanting some of my grandmother's aloe plant into it for me!
And one of my favourite pieces, a jadeite green soap holder:
I found this guy in an old trunk of my great-grandmother's along with a TON of vintage 1930's-1940's wallpaper.
I want to continue my collection of Jadeite.
Some of my dream pieces....
Refrigerator dish
Scottie dog salt and pepper shakers! Couldn't you just eat them up??!!
Pitcher
Do any of you lovelies collect Jadeite? Tell me all about your collections!!
xx
Labels:
1940s,
1950s,
Anchor Hocking,
Drinkmaster,
Fire King,
Hamilton Beach,
Jadeite,
Restaurant Ware
Subscribe to:
Posts (Atom)